Tuesday, February 15, 2011

Vanity Fair

Today has been absolutely glorious.  The sun has shimmered all day long, and the air is so mild that we propped our front door open to let a warm breeze waft through our house while we putter around—in the middle of February!  Just another reason we love Colorado.  Is anyone else about ready to jump out of their skin thinking about daylight savings time?!  I can hardly wait until we gain an extra hour of daylight—blissful!

Hmmm…where was I?  Oh yes—bathroom vanities.  When we decided to knock out the third bathroom door, we gained some serious wall space.  Before, we were pretty much confined to a pedestal sink, and no matter how darn cute they are, they offer little in the area of storage and functionality.  Instantly I began researching our new vanity options.

My first instinct was to make a DIY vanity out of a dresser, especially after seeing our friends’ charming bathroom.


While scouring American Classics Marketplace, a huge building stuffed with antique treasures, I spotted several unique pieces that I thought would look great in our bathroom.

[gallery link="file" order="DESC" orderby="ID"]

…until Matt started drilling me about their durability and size.  (Husbands...you’ve gotta love the dose of reality that they bring to the table.) Although I believe that we could have made it work, it’s completely possible that we would have put a lot of effort into restoring a vanity with loose drawers, wobbly legs, and an imperfect height. The truth is, when your house contains only one bathroom, you don’t have quite as much room to play around.

I boldly began again.  To compare the different styles of bathroom vanities on the market, I went online and searched some of my favorite sites—Pottery Barn and Restoration Hardware.  Now keep in mind that I rarely ever buy anything from these stores, despite being sorely tempted, as they are most definitely out of our budget price range.  Still, they know how to design a beautiful, clean bathroom, which is a look I covet, yet often struggle to find among major retailers.  It didn’t take long before this look began tugging on my heartstrings.


Now, if only I could find a similar look elsewhere for less… On to Home Depot and Lowe’s.  In all honesty, I wasn’t that impressed with the selection in their stores, but thankfully, online was a different story.  We ended up finding this vanity, which we felt shared some of our favorite features of the Pottery Barn vanity—storage, a rich espresso color, chunky legs, and an exposed shelf underneath for storing towels or simple accessories.  The price tag was a little more than we had originally anticipated, but with a 10% off coupon and the knowledge that we had saved our fair share of money on other house projects, we swallowed hard and placed the order.

Several weeks later, our brown beauty arrived on our doorstep.  We were thrilled with the color, as the online reviews varied in their thoughts on the tone—some thought it was reddish and some thought it was black.  We were hoping it leaned toward the black/espresso side of things, and to our relief, it did.  But as is the case with many house projects, there was a hang up.  As in a busted drawer and a cabinet door that didn’t close properly.  While I wiped away a tear or two, we loaded the vanity back into the box and hauled it to the nearest HD right before they closed for the night (we I have never been known to wait around for my patience).  To give them credit, they immediately returned the vanity and bumped us to the top of the list for a new one.  We signed, wondering how many more weeks we would brush our teeth using the kitchen sink.
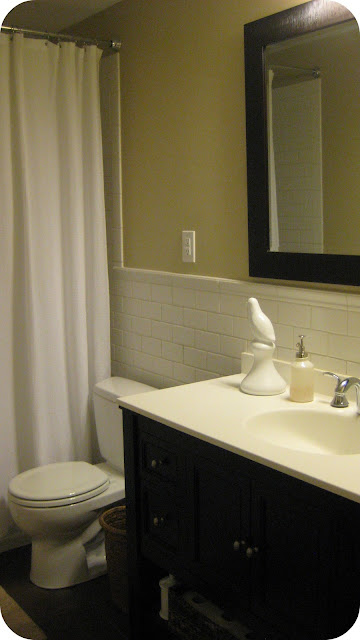

But before we knew it, a second vanity appeared on our doorstep, and this time it was pristine condition.  Oh happy day!  Details soon to come on how we chose a mate for our vanity.

Monday, February 14, 2011

Valentine's Day

According to Plato, "At the touch of love, everyone becomes a poet." DIYers might say, "At the touch of paint, every wall becomes a canvas." So cheesy...I know. But it's Valentine's day, so somehow that makes it okay, right? Since I slacked off on the Valentine's day decor this year (although I did read up on some really fun ideas in Martha Stewart Living's February issue), I thought I'd share a sweet poem written by my sister Hannah's college friend, Randy.


In a defaced bathroom stall in bold black Sharpie, the tribute
in the front cover of the book
you are reading, carved on a tree in the state park
that is older than any person on earth, loopy doodles
dancing merrily along a notebook margin, traced in the snow
or sand, or scrawled on a piece of paper to be passed
across the room, you will find it
in many forms, but always broadcasting the same message.
TC + HM 4EVER, I heart Johnny
It could be as simple as a glossy purple check box
with a shaky, penciled affirmation slashing its simple confession
back to the pink-faced, blue-eyed giggling girl,
or it could be as meticulous as the engraving, orbiting
the inside of the band, the same one
that has been on his now-weathered hand for forty-six years.
I’ve seen it on license plates, decals, pins, bumper stickers,
earrings, arranged in the primary-colored alphabet magnets
on the refrigerator, or a blurry red tattoo
on a grizzled old biker sitting in the truck plaza.
You may find it in the bright pink aisles during February, on cardstock
or silk boxer shorts, or embossed on the shiny surface
of a heart-shaped box of sweets. Regardless
of its source, the reader knows the meaning. Faceless characters
in the shortest stories ever written stage the tiniest plays
all over life’s surfaces, and when fate places the pen
in your trembling hand, write.

Don't you just love it!? What about you guys? What is the most unique way that you've declared your love? Spill the beans!

Friday, February 11, 2011

My New Best Friend

Meet my new best friend—it’s quick drying, sticks to nearly anything, and can be found in soft muted tones.  That’s right—spray paint.

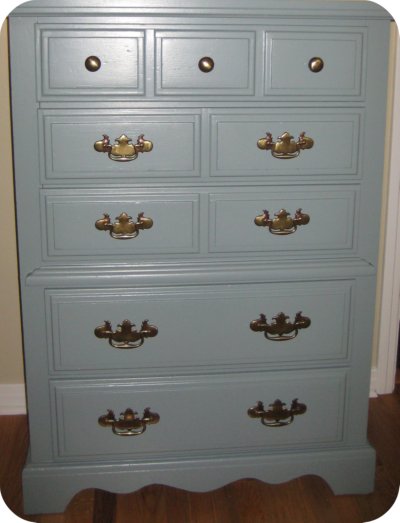
See, for the longest time I’ve been aching to repaint the dressers in our master bedroom.  These bad boys have been around for awhile now.  Before I entered college, I dug mine out of my aunt’s basement and ended up giving it a two-toned look where I painted the drawers a different color from the base.  The hub’s dresser was passed down to him from a friend—covered in stickers, nonetheless.  A few weeks after our honeymoon, I rescued it by sanding off the stickers and freshening it up with some paint.  Since new hardware is expensive, I chose to ignore the brassy, rusted pieces that adorned each dresser, hoping that we might get new dressers down the road.  But the reality is that new furniture is expensive, and I actually love refinishing old pieces and finding ways to bring them back to life.  So when I started fiddling with the paint colors in our bedroom this past weekend (remember how I alluded to the fact that the orangey color might be on its way out?), I realized that the brass hardware was killing all hope of a calm, soothing space, because no matter what color I painted our dressers, the glaring hardware was all I could see.

Then I stumbled across Kate’s delightful blog, Centsational Girl, and wouldn’t you know, she is a spray paint queen!  I was totally inspired by all the different ways that she uses spray paint to restore furniture—even old hardware.  And with a burst of confidence, I popped over to Home Depot and grabbed a can of Rustoleum’s Winter Gray.  Don’t you love that spray paint now comes in soft soothing tones?

Check out the brass in all of its glory…


Now see the difference a few coats of spray paint can make?


I don’t even notice the old-fashioned design anymore, because the color of the hardware is close enough to my paint color that it looks layered and lovely—all for under $4!  The updated hardware changes the whole room, and the best news is that it isn’t sticky or clumpy.  By using a spray paint grip (that I bought for under $3), I easily applied a coat of spray paint.  Then I let it dry for a few hours (although it probably dried in less time than that) before spraying on a second coat.  Since my hardware has floppy handles, I sprayed on the first coat with the handle facing up, and I sprayed the second coat with the handle facing down.  Waalaa!  New hardware for our gussied up dressers.

Have you used spray paint to completely transform something?  Details, please!

Thursday, February 10, 2011

Just Call Us “Team Tile”

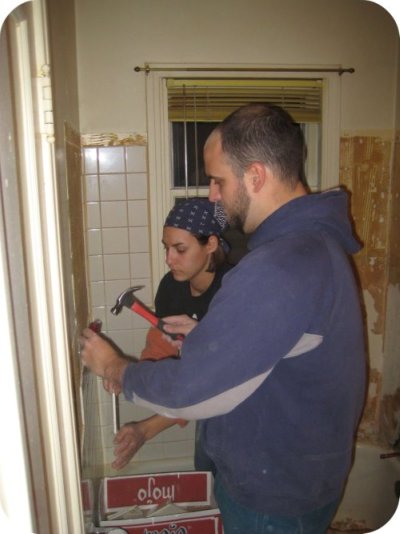
You know how when you start tinkering around with things, it can suddenly turn into a huge project?  Well, that’s essentially what happened during our bathroom remodel.  It started with, “This tile is uggggly.”  Before we knew it, we were yanking off speckled brown tile left and right, grinning madly about our success.  It was my first true experience with demo, and I loved it!  Just remember that demo is only the first part of the process…it doesn’t end there.


Before we bought our house, I was positive that I wanted a bathroom decked out with clean, white subway tile in the shower, layered against a black and white hexagon tile floor, like this.  When I found out that it was possible to buy sheets of hex tile online through Home Depot, I flipped out and nearly ordered it on the spot, but thanks to some good sense, we decided to check out our local options in hopes of striking a better deal.  Once we started looking around, I realized that I am not a fan of busy patterns—I prefer to stick to the basics so that I don’t tire of it too quickly, plus I can always change the paint or décor down the road if the tile is simple enough (think of all the people who installed pea green tile back in the day…I wonder how long it took before they realized what they had actually committed to!).  Not only am I not a huge fan of busy patterns, I also am not a huge fan of black—as in, other than clothing, nothing that I own is black!  When it comes down to it, I am way more of a brown tone gal.

After searching the big boys, Home Depot and Lowe’s, we took a chance on a place called The Carpet Exchange.  Turns out that despite their very misleading name, they actually carry tons of tile (I let them know they should change the name of their store—I’m sure they’ll be forever grateful to me when their customer base increases dramatically overnight).  While The Carpet Exchange wasn’t necessarily the least expensive, they had a better selection than the other stores.  Once I finally allowed my brain to shift gears, we stumbled across some lovely earthy chocolate brown tile at an affordable price.  That also meant we could use a dark grout (Poleyblend Sable Brown), which would be easier to keep clean than white grout on a bathroom floor—yipes!  While we were at it, we ordered our subway tile through them (we chose matte over glossy), although looking back, I have a feeling we would have gotten the subway tile for a better deal through a big box store.  Live and learn, right?  At least in the world of DIY…

Soon after, Matt went to town tiling the entire bathroom on his own—check out his detailed handiwork!  Isn’t it great?!  And boy are we glad for simple inventions like tile spacers—we used hundreds of them during this project!

[gallery link="file" order="DESC" orderby="ID"]

And that, my friends, is a wrap for Team Tile!

Tuesday, February 8, 2011

Doors Galore

In addition to the funky window inside the shower, our bathroom also sported three doors.  That’s four escape routes for a very small room—heck, five if you count the door to the bath closet.  At first glance, three doors didn’t concern us.  At least the bathroom was accessible, right?  We loved that there was a door connected to the master bedroom, along with an entrance immediately off the living room.  The only door that seemed a bit frivolous was the one leading into the back guest bedroom.  But like I said, we weren’t too concerned.

Then the rents came to town.  Parents—gotta love ‘em.  Especially my dad, who is the epitome of a self-made handyman; if he doesn’t know how to do it, he’ll bulldoze his way through it.  Dad, if you’re out there, you know I love this about you!  As we gave them the house tour (or should I say the stand-in-one-spot-and-you-can-pretty-much-see-the-whole-house-at-a-glance), we asked them if they thought all three bathroom doors were really necessary.  After a quick hash through the pros and cons—where the pros far outweighed the cons—they both agreed that two doors would be quite enough.  And within about two minutes, my dad and Matt were making a list of all the supplies they would need from Home Depot.

Looking back, I’m glad I didn’t realize how insane we were to try to refinish floors and knock out a door / frame in a wall—which, by the way, also tacked on a plumbing project, as well as the removal of some wall tile, since the pipes had to be adjusted—because this ended up being one of the absolute best changes we made to our house.

[gallery link="file" orderby="ID"]

Despite the stress.  Despite running to HD a bazillion times within 48 hours.  Despite the fact that we then had to reconfigure our bathroom vanity situation, which meant returning the adorable pedestal sink we had already purchased and *cough* removed from its packaging (note to self—do not remove packaging until you’re installing item)—more details soon to come on how we picked out our new vanity.  Thank goodness Home Depot allows you to return nearly anything without raising a fuss about it.  Plus, if you buy items using your credit or debit card, they can look up your purchase without the original receipt within a 90 day window.  Gotta love a customer friendly store.

After two grueling days of sanding floors and knocking out a door in the midst of it all, we gained some beautiful space in our bathroom (hooray for extra storage and counter space—and a larger mirror!), and so did the guest bedroom (the additional wall area created a perfect niche for our desk).  While I usually am a stickler to the plan, I must admit that being flexible in this case was 100% worth it.

Monday, February 7, 2011

Once Upon a Bathroom

Our house has one bathroom.  This is not unusual for a downtown house of our size, but one bathroom in this day and age certainly is.  The upside—scrubbing only one toilet and shower!  But having only one bathroom means it had better combine function and style in one package—at least in my perfect world.  In a nutshell, our bathroom originally had neither.  In fact, our bathroom had some really odd things going on with it…check out the shower.


If you’re wondering why there is a shower curtain at the back of the shower (in addition to the front curtain), it’s to cover the wooden window that some genius plopped right in the middle of a place that should be totally private, not to mention waterproof!  To give the poor builder some credit, they probably were required to stick to a code that said if there was no fan, there had to be a window in its stead.  (By the way, I wonder if that’s how the word “instead” originated.  Hmm.  Pardon the English teacher digression.)  Whatever the case, we knew the window either had to be replaced by a more waterproof version or completely knocked out.  Since we weren’t all that confident in knocking out walls—or windows—we buzzed over to the Home Depot to check out the cost of a replacement window.  Turns out it would cost about $200 to replace the wooden window with a vinyl (aka waterproof), blurred (aka private) window, and that did not include installation—another area of concern.  But $200 isn’t exactly pocket change when you’re on a budget, and we weren’t totally convinced that the window wouldn’t warp at some point.  On top of that, if we ever are able to replace all the windows in our house, we’d like them to be uniform, and we definitely weren’t ready to commit to a window style at that point.

In the end, our friend told us that he could remove the window, and while he was at it, install special waterproof cement boards, Durock.  That brought a grin to our faces, because it meant we could get rid of the built-in soap bar holder (a mar in nearly every shower) and redo all of the tile starting with a clean slate.  Plus, we’d never have to worry about any weirdness with our neighbors knowing exactly when we happen to be showering....


And thus began the gutting of the bathroom—a happy day and the beginning of an epic journey.  Well, maybe not epic, but definitely long and dangerous full of adventures.  Does anyone else have a funky bathroom story to share?  Do Tell.

Thursday, February 3, 2011

Brick Pick

One of the things that initially drew us to our house was the gas fireplace.  We love the idea of a blazing fire—especially at the flip of a switch (or in our case, a knob at the base of our fireplace).  We’re pretty sure that it used to be a real fireplace, but was later converted to gas.  And despite the controversy over gas vs. real, I, for one, think that we will be more likely to use a gas fireplace, as they are convenient and clean (Matt does enjoy starting a good fire from scratch, though, so we might have slightly different opinions on the issue).  Sadly, it doesn’t really matter, since we cannot get the fireplace to light at the moment.  We’ve done a bit of digging around, and we eventually found the original manufacturer of our gas fireplace parts; however, even after emailing them photos of the whole set-up, they were not able to find replacement parts.  Maybe they’re no longer made?  If you know anything about R.H. Peterson fireplaces, we are looking to replace some parts (the fire safety starter kit which includes the pilot light and thermal coupling).  If that doesn’t work out, we’ll probably end up getting a whole new gas set-up, but we’d like to do it as cheaply as possible—hence, the digging around for parts.


But since we’ve recently been talking paint, we thought we should give you the rundown on painting our fireplace brick.  At first, we debated over whether or not it was worth it, as original brick is a selling point for a lot of people; while we’re not looking to sell our house anytime soon, we’re aware that the choices we make now may have repercussions (although hopefully good ones!) down the road.  Then we swung in the opposite direction, thinking that we should do what we like, since we’re the ones living with it, and who really cares what future buyers might think?  After considering both sides, we landed somewhere in the middle.  Why can’t we have the best of both worlds, after all?  So we grabbed our brushes and went to town painting the brick, knowing that we would love it (score!) and hoping that future buyers who are interested in our house like our style enough that they’ll be happy with painted brick (bonus!).


A few things to keep in mind when painting brick:

1.) Look at pictures of painted brick (there are tons of images online) to figure out what you like.  We love a light and airy feel, but there are lots of ideas to choose from—click here and here to see a few of our favorites.

2.) Make sure you start with a clean surface.  There is nothing worse than gunking up your paint with dirt and soot.

3.) Using a brush or roller, prime the brick first, as it tends to be an absorbent surface.  I prefer a brush, since it nicely fills the grooves in brick.


4.) Layer on the paint thickly—again, so that it doesn’t get absorbed by the brick.  Paint several coats if necessary.

5.) We chose a glossy paint (the same kind that we used for our floor trim), that way the brick is smooth and easy to wipe down, plus it should hold up better if we ever do have a fire in said fireplace.  And there you have it—easy peasy!  Honestly, I was a little freaked out to make such a permanent move, but now I can’t imagine our fireplace any other way.  As the focal point in our living room, it was a cheap and quick project that completely changed the space.  Oh, and just in case you were curious, we removed the old mesh screen (it found a new home at the Restore) with a few quick turns of the screwdriver, and thanks to Craigslist (gotta love it), we replaced it with a simple portable screen that doesn’t feel quite so heavy.