To see if you are the winner of My Chic Shanty’s first giveaway, click here! Thanks to those who participated, and especially to Ginelle Irene and her sweet Etsy shop!
Tuesday, November 15, 2011
Monday, October 31, 2011
Nifty Gifty: Button It!
This giveaway is now closed. Lori is our winner, and she has been contacted to receive her prize. Thanks to all who participated!
That’s right—it’s the first official gift giveaway for My Chic Shanty, and we’re so happy to partner with Ginelle, who is actually married to my cousin, Casey. (Speaking of marriage, she went the extra mile and made all of their wedding thank you cards herself!) Using a variety of textured materials, including buttons, thread, vintage items, canvas, and more, these lovely pieces are created.

Ginelle’s family owns a greenhouse and flower shop in Canada, so crafting in the realm of flowers and plants is truly second nature to her. Be sure to check out the rest of her unique designs online at her Etsy shop.

*If you are interested in participating in Nifty Gifty as a host, just leave us a comment and we’ll be in touch!
That’s right—it’s the first official gift giveaway for My Chic Shanty, and we’re so happy to partner with Ginelle, who is actually married to my cousin, Casey. (Speaking of marriage, she went the extra mile and made all of their wedding thank you cards herself!) Using a variety of textured materials, including buttons, thread, vintage items, canvas, and more, these lovely pieces are created.
Ginelle’s family owns a greenhouse and flower shop in Canada, so crafting in the realm of flowers and plants is truly second nature to her. Be sure to check out the rest of her unique designs online at her Etsy shop.
- GIFT: One unique, handmade card from Ginelle Irene’s Etsy shop!
- HOW TO ENTER: Comment on this post with the words “Button it!” and tell us…
- FUN TIDBIT: …what you love about buttons, memories you have involving buttons, or when you’ve told someone to “button it!” (This is not required to enter, but do it for kicks!)
- GIVEAWAY ENDS: Monday, November 14 at midnight MST
- NUMBER OF WINNERS: One lucky guy or gal
- SHIPPING: The United States or Canada
- SUBMISSIONS: One entry per email address is permitted. The winner will be selected randomly and announced the following Tuesday as an update to this post.
*If you are interested in participating in Nifty Gifty as a host, just leave us a comment and we’ll be in touch!
Wednesday, October 26, 2011
Exterior Facelift
We all say it’s what’s on the inside that counts, but let’s be honest.

External first impressions do leave a mark. It’s true, even if we don’t want to admit it, which is why I’m so happy to report that our house finally got an exterior facelift. Woot! Our main summer goal was to refinish the stucco on our house—yes, we know it’s practically winter—but the process has taken quite a bit longer than we expected. You would think we’d know better by now…
Initially, we planned to paint over the old stucco ourselves using quality paint made for rough exteriors, like Duramax from Lowe’s. But in the midst of making that decision, we had our stucco repaired in a few spots by a local stucco handyman named Antonio…and come to think of it, I actually have no idea what his last name is. Anyway, good ole’ Tony was recommended to us by our neighbors, and since their house is lovely and they had nothing but glowing comments regarding his work, we called him up to work on our house. You can see one of his repairs on the basement window.

After he finished the small repair jobs, he asked us if we planned to repaint. We said yes, that was the plan. Then he threw us a sales pitch saying that he could put a stucco paste—tinted a color of our choice—over our entire house for a very reasonable amount of money. We kind of stammered around for a second and then told him we’d let him know if decided to go that route. I’m pretty sure both of us were rolling our eyes though, because even though he quoted us a low price, paint was certain to be much, much cheaper. Right? That’s when we realized that while paint may normally be a cheap and quick fix, it might be a different story when the exterior is involved.
As it turns out, quality paint that is designed for stucco would have cost us only a few hundred dollars less, since we would need to do two coats (which would eventually need to be repainted, unlike tinted stucco paste), plus hours of our own labor. Not long after actually calculating the cost of painting the house ourselves, we happily called Antonio to see when he could get a crew over to our house. *I’m not gonna lie. Contractors can be a pain to get ahold of, and while we loved his work, Antonio was no exception. Thankfully, it was worth the wait.*


")


The color is slightly grayer than I envisioned, but overall we love it—especially the fact that they were able to update the texture to a more modern look that hides previous imperfections. It’s just nice having a cohesive exterior; everything looks so much cleaner. Clearly the neighbors feel the same way, because we’ve received lots of compliments—even from folks just meandering by on a walk with the dog.
My favorite part might actually be the back stoop. Check it out…


If you’re wondering about the white trim, we painted it ourselves before the stucco guys arrived. Despite having a small house, it took us a full weekend and a half to put on one coat of primer and two coats of Sherwin Williams exterior paint.
We’re not done quite yet though. I’m itching to paint the front door, and we need to add some lights and house numbers. Hopefully we’ll make some headway on those things this weekend. Eventually I plan to spray paint our mailbox (which is happily sitting the planter at the moment…), and when the weather warms back up, we’ll add the adirondack chair we picked up at ACE for a song, along with some plants.
Ultimately, I’m just glad I no longer have to tell people coming to our house for the first time, “Yeah, it’s the pink and yellow house. You can’t miss it—it’s the ugliest house on the street.” What do you think?

Monday, October 10, 2011
Homemade Pumpkins
No, I am not writing about food made with pumpkin, although I have been craving pumpkin desserts like a nut lately! And yes, this weekend I did make the.most.delicious.pumpkin.cream.cheese.muffins.ever. I’ll even be nice (although I’m sure the calories are, um, not so nice) and share the recipe with you. Check out Annie’s Eats—which is rapidly becoming one of my favorite blogs—and give her muffins a try. Scrumptious, I tell you!
But if you’re looking for a cheap and easy fall craft, these homemade paper pumpkins are right up your alley.

Seriously, I was listening to a podcast and messing around with some scrapbook paper, and within ten minutes both of these pumpkins magically appeared!

Find the step by step instructions here. You might notice that I made my pumpkins more petite, which makes them more portable for decorating. I also used jute twine in place of ribbon, and I love how it stands up like a stem and has an organic feel to it (some of you know that I think the word “organic” is way overused, but it just seems to fit here…maybe that’s why it’s overused…people just think it fits everything…I digress). One more look at the cute couple.

Just for the record, I love Pinterest, and recently I’ve been trying to actually make some of the things I find on the site, as it’s so easy to pin and never do. Ya know? Speaking of, I think it’s time to get your Betty Crocker on and try your hand at those pumpkin cream cheese muffins—before you forget about them and move on to something else. They’re just too good to miss. Promise.
I totally ended up writing about food made with pumpkin. Such is blogging. (Did you know these little guys are called “emoticons”? What a crack up!)
Wednesday, October 5, 2011
Gettin’ Twiggy With It
Fall is upon us my friends, and it has caused a small frenzy around our house as I’ve been bustling with energy that comes from crisp autumn air and the spirit of a new season. Due to this burst of creative juices, I’ve finally attempted to finish several ongoing projects, like filling our bare walls. One of the fastest ways to change the mood of a room is to change out the art. Now I am no art expert, nor do we have any so-called “real” art. But I do enjoy a project, so when I saw this idea roaming the blogosphere, I added it to my Pinterest art board and kept it tucked away for a rainy day.

You might remember when we added these clean white frames to our dining area…
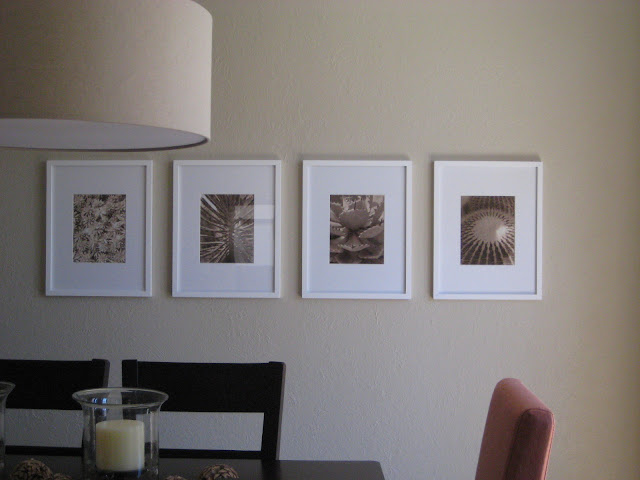
And you might recall that I shifted them to the living room and filled them with placemats…

I was quite certain that we would make a collage wall in our dining room, since it’s the only room where the walls are made of sheetrock, rather than plaster, making it much easier to hang things. But, it was not to be. At least not yet. My décor seems to change with the wind, and I fully reserve the right to blow where it takes me. As long as it’s okay with the hubs.
Which brings me back to the twiggy art. As I was digging through our basement one weekend afternoon, I stumbled upon a massive old frame that I used to have as the “Word Wall” in my classroom, along with a bundle of decorative twigs that never really fulfilled my original vision. Light bulb moment! Within 30 minutes I was spray painting my artwork and beaming over my success. It’s the little things in life, truly.
Project breakdown:
1. Gather materials: frame, twigs, knife, hot glue/gun, spray paint
2. Decide if you want your twigs aligned vertically or horizontally. I chose to go horizontal, because it seemed to flow with the layout of the room, rather than chopping it up.
3. Cut twigs to fit inside frame. I broke a pair of scissors doing this, even though the twigs are make of fairly soft wood, so I recommend a sharp knife.
4. Space the twigs to your liking and then hot glue them to the inside of the back of the frame. I glued each end of the twig to the lip of the frame for stability.
5. Allow hot glue to dry completely (this doesn’t take long), and then remove any hot glue strings.
6. Spray paint several thin and even coats onto your artwork in a well ventilated area.
7. Hang and enjoy!


We’re enjoying the modern, yet slightly rustic feel of the piece. The best part? It only required two holes to hang—and it was essentially free, since I had all of the materials on hand!
What artsy concoctions have you whipped up lately?
Wednesday, September 28, 2011
The Best Laid Plans…
This post has been a long time coming…over a year, in fact. But honestly, I’m not sure I could have written about it sooner, as it took an emotional (and financial) toll that was really tough to swallow. When we bought our little shanty, it needed a new topper, as our insurance company said they would not cover our existing roof. Hello peeling shingles…and gutter…and paint…cough…yeah, we’re working on the exterior of the house, just in case you had doubts.

We could tell that some previous water damage had already occurred in the back bedroom, so we made plans to re-roof within six months. In July of 2010, we snagged a week that promised good weather, called up a host of friends and family, and piled on the roof to pull off the myriad of shingles that were rotting away.

To our dismay, there were not just two—but three—layers of shingles smothering our home, with the bottom layer being cedar shakes. This was unfortunate for several reasons: 1. Cedar shakes must be removed one by one, which is quite time consuming. 2. No plywood sheeting existed under the shakes—only slats of wood. Again, time consuming, considering we had to make an impromptu run to Lowe’s, shell out additional dough, strap huge sheets of plywood to the top of Matt’s Xterra, and haul it up to the roof. Hence, the title of this post…

*Tidbit: While Matt was flying home with the plywood strapped to the top of his vehicle, it came untied in the middle of a major intersection! Yes, the hubs (plus several kind bystanders) halted traffic and scrambled to gather the scattered pieces of wood. Thankfully, no one was hurt, no cars were damaged, and no wood was splintered. Maybe a guardian angel was also standing by? And I wasn’t there to freak out about it, which is also a blessing.*

Anyway, we were able to nail most of the sheeting down, but to make a long story short, the roof was not fully waterproofed before a massive storm rolled in—an unpredicted storm, at that. We were eating a quick dinner when I heard the sounds of rain pattering. Before I could tell myself that it would likely pass over quickly, I saw water streaming down our walls—rivers of water that began pooling on our newly refinished wood floors. Within seconds, the bowl-shaped light fixture in our hallway spilled over with water. It didn’t take long to realize that every crook and cranny of our house was going to be soaked. Yes, my friends, the rain came down and the floods came up. Colorado Springs experienced possibly the most torrential downpour—from 7 pm until midnight—I’ve seen since moving here over five years ago. And not only that, but it continued to rain on and off for several days—even in the mornings, which is completely abnormal. We live in the desert, people! Needless to say, it was a living nightmare.
You may be wondering what my reaction was during this crisis. Perhaps I was simply in denial about the fact that six months of insanely hard DIY work was literally going down the drain, because I buried myself in a juicy book and then announced that I was going to bed (don’t judge—we had already used every towel and bucket/bowl in the house to catch rainwater—what was there left to do?).
*Tidbit: It was at about this time that I called my boss at the golf course and informed him that I would not be coming in tomorrow because, and I quote, “I’ll be picking up the pieces of my life…[sob/hiccup].” I heard about that one—usually with a mixture of laughter and sympathy—for the rest of the year. Apparently some people thought I was being dramatic…which is, uh, probably true.*
I fell asleep within moments and didn’t wake up until the next morning (somehow the front of our house didn’t get wet—so our bedroom was thankfully a safe zone—other than my closet, which was drenched). Crazy, right? I’ve often wondered if I”m narcoleptic. While I snoozed, my mother-in-law and her husband brought fans over to help dry out the attic, while Matt stayed up until 2 a.m. doing who knows what. Alright, alright—clearly I don’t win Wife of the Year points for hiding out during our crisis.

Fast forward to a few days later. We finally finished our roof (a local doctor, who is the uncle of one of our friends, actually came over to help us finish, and we had never even met him!) and were waiting to see if the fans in the attic would dry things out. Errr!! That’s a negative. We finally ended up calling our insurance company and somehow they agreed to cover the damages, which is completely nuts, because they would not even cover the original roof. We were totally honest about what happened, but chose not to question their merciful act and instead praised the Lord that we were not going to have to redo all our our previous work, like putting up new sheetrock, blowing in new insulation, re-mudding ceilings, etc. The damages actually came out to over $20,000. Unbelievable. Because our kitchen cabinets were removed to repair the kitchen ceiling/walls, we actually got new cabinets and countertops—with self-closing drawers, I might add! If there’s anything good that came from the water damage, that’s at the top of my list.

Before any work could be done though, they had to dry out our house. For two weeks they ran huge dryers in our house to ensure that no mold would grow (by the way, none did—whew!). Check out the effects…


It was like walking into a haunted house. A living nightmare.
Thankfully, some good friends let us crash with them for six weeks while all of the damage was repaired. Now that’s friendship. We received a great deal of encouragement from our friends and family during this tumultuous time in our life, and we truly do not know how we would have survived it without them. While we still put in quite a few hours (and some of our own money) repairing damage, we know that it would have been unbearable if the insurance company had not come through in the clutch. (If you’re wondering, we have Allstate insurance.)
Home improvement projects run the gamut of being a joy and a total pain. Looking back, it’s easy to say that we should have just hired a roofing company, but no one can predict these things. In many ways, I appreciate our house more now, and although it took me several months not to check every room when it rained, I feel like our house may be even better now than it was before (ahem…this provided me the opportunity to repaint without guilt!). After experiencing the horror of not having a functional roof, we sponsored a roof for a family in Africa around Christmas. It was one of the most meaningful gifts we’ve ever given, as now we understand that having a roof over our heads—something most of us take for granted—is a blessing that can not be underestimated.
What about you guys? Have any of your DIY projects turned into catastrophes? Feel free to leave a comment with the details. Think of it as writing therapy!
Tuesday, September 6, 2011
Placemat Wall Art
Ever since moving in to the Chic Shanty—although I’ll be the first to admit that it’s definitely more shanty than chic in some areas, especially the exterior—I’ve battled with our plaster walls. Most of the time I end up backed into a corner, waving my white flag in surrender. I’ve mentioned this before, but it bears mentioning again that plaster walls—while a sign of good craftsmanship—are a pain in the you-know-what when it comes to hanging art. Because they’re made like cement, hanging even a light, simple piece of artwork requires a special set of tools and a plastic casing which surrounds the screw going into the wall. Gone are my days of lackadaisically banging a nail here or a nail there just to play with the placement of a frame. Plaster = permanence. Unless, of course, you like chunks taken out of your walls. All that said, it’s taken me some time to decide what I want hanging around our house.
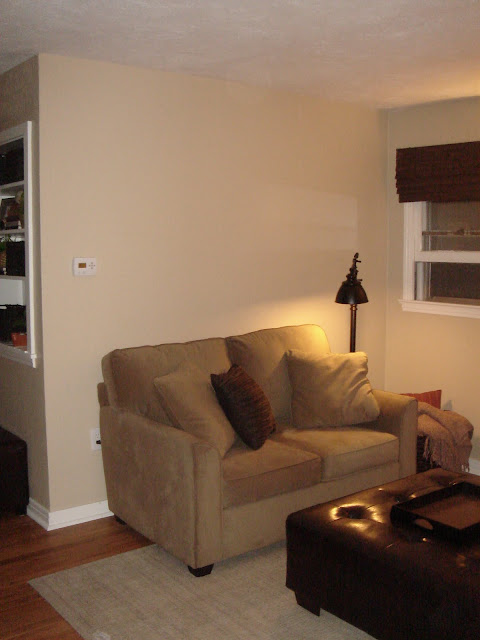
As you can see, the wall above the loveseat needed some, um, love.
So, after hemming and hawing for literally a year or more, I decided on placemats—the obvious choice for a high-traffic, first-thing-you-see-upon-opening-the-front-door.
If you’re doubtful, let me say that I actually didn’t go out looking for placemats to fancy up our walls. Rather, as I was meandering around Target, I stumbled across these funky vinyl mats.
What drew me to them?
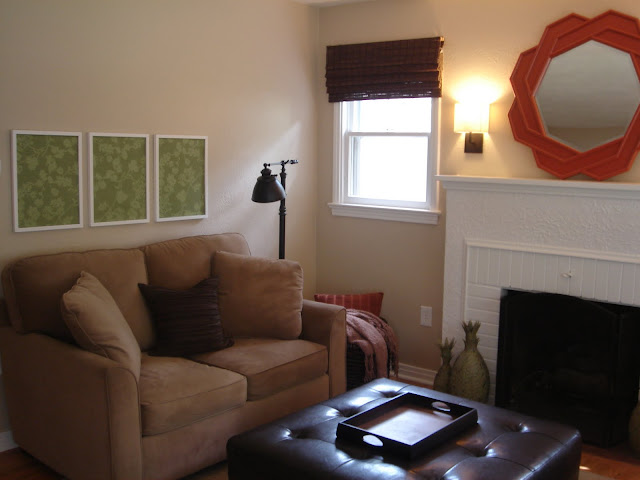
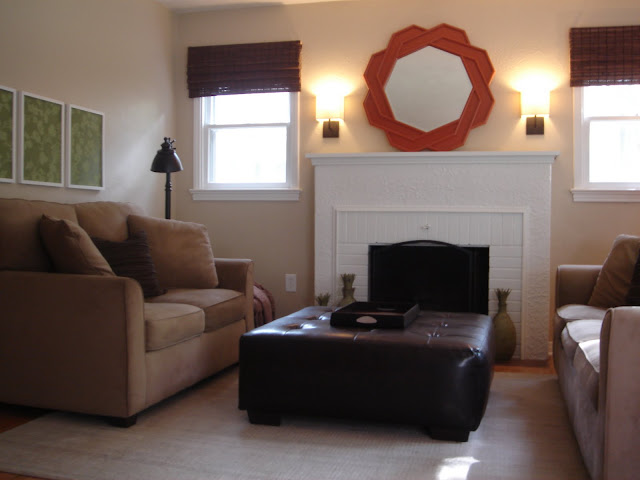
1. Their green hue ties in well with the pineapples flanking our fireplace, plus they add a touch of color to our neutral walls. Now I’m not promising to keep the color forever. A very rebellious part of me screams, “I love layers of neutrals!” So who knows? Maybe someday I’ll ditch the orange and green accents in favor of layers of creamy beige. I know some of you are dying right now…you color lovers.
2. Because they’re vinyl, they have a killer texture. I adore layers of texture.
3. They’re double-sided, so I got to play around with which design I liked best.
4. They cost $3.99 each, for a total of $12. That’s not a bad price for art that covers a large area, and it means that when I get the itch to replace them (which is nearly inevitable), I won’t feel guilty about it!
5. They fit into the clean white frames that we already owned with only some slight trimming around the edges.
6. They were unique enough that I had the urge to display them—just not on our table.
I totally understand that adorning walls with placemats—especially vinyl—is not for everyone. But if you’re interested, here’s the breakdown of how I did it.
1. Cut the placemats to fit into your frames.
2. Hot glue the outer edges of the placemat to the back of the frame, which is usually a piece of cardboard or compressed wood. I added a dab of glue to the middle of the placemats so they wouldn’t bulge out when hanging. Since my mats are vinyl and hot glue peels off easily, I don’t think removing them from the back of the frames will be difficult should I ever wish to change out the art.
3. Remove the glass from the frame and simply insert the back of the frame with the glued-on placemat. Secure and then hang.
Simple, right? I love finding ordinary things and acquiring new uses for them. I also love doing projects on the cheap and creating a unique—some might say quirky—look. I haven’t decided if I’m going to tell anyone that they’re placemats…so shhhh! It’s a secret for now.
As you can see, the wall above the loveseat needed some, um, love.
So, after hemming and hawing for literally a year or more, I decided on placemats—the obvious choice for a high-traffic, first-thing-you-see-upon-opening-the-front-door.
If you’re doubtful, let me say that I actually didn’t go out looking for placemats to fancy up our walls. Rather, as I was meandering around Target, I stumbled across these funky vinyl mats.

What drew me to them?
1. Their green hue ties in well with the pineapples flanking our fireplace, plus they add a touch of color to our neutral walls. Now I’m not promising to keep the color forever. A very rebellious part of me screams, “I love layers of neutrals!” So who knows? Maybe someday I’ll ditch the orange and green accents in favor of layers of creamy beige. I know some of you are dying right now…you color lovers.
2. Because they’re vinyl, they have a killer texture. I adore layers of texture.
3. They’re double-sided, so I got to play around with which design I liked best.
4. They cost $3.99 each, for a total of $12. That’s not a bad price for art that covers a large area, and it means that when I get the itch to replace them (which is nearly inevitable), I won’t feel guilty about it!
5. They fit into the clean white frames that we already owned with only some slight trimming around the edges.
6. They were unique enough that I had the urge to display them—just not on our table.
I totally understand that adorning walls with placemats—especially vinyl—is not for everyone. But if you’re interested, here’s the breakdown of how I did it.
1. Cut the placemats to fit into your frames.
2. Hot glue the outer edges of the placemat to the back of the frame, which is usually a piece of cardboard or compressed wood. I added a dab of glue to the middle of the placemats so they wouldn’t bulge out when hanging. Since my mats are vinyl and hot glue peels off easily, I don’t think removing them from the back of the frames will be difficult should I ever wish to change out the art.
3. Remove the glass from the frame and simply insert the back of the frame with the glued-on placemat. Secure and then hang.
Simple, right? I love finding ordinary things and acquiring new uses for them. I also love doing projects on the cheap and creating a unique—some might say quirky—look. I haven’t decided if I’m going to tell anyone that they’re placemats…so shhhh! It’s a secret for now.
Subscribe to:
Posts (Atom)